Acrylic sports court flooring has become one of India’s most reliable go-to choices for tennis, pickleball, basketball, volleyball, badminton and multi-sport facilities that are used by the community – schools, academies and clubs as well as in local residential areas. It’s multi-layered structure, which was carefully engineered to withstand the elements, and the consistent performance it delivers when you’re playing on acrylic sport flooring.
The power of an acrylic surface has nothing to do with the materials used themselves – it’s about how these materials are laid down. Simple mistakes during the construction process can affect the court’s grip, bounce, flow of water, durability and lifespan of the court.
This guide takes a close look at the most common errors that people make when laying out an acrylic floor, what causes them, and exactly how they impact the performance of the court. It also shows you the steps you need to take to prevent these problems from arising.
Why Acrylic Sports Flooring Requires Precision
Acrylic flooring is so much more than just slapping a coat of paint onto cement – the installers actually put together a bespoke system, where every single little detail counts. They get the layer thickness spot-on, mix the right proportions, do their best to work in the right weather, and sort out the sub-base properly so the court stays reliable for years to come. A standard synthetic acrylic court comes together by carefully layering up several different elements that get all bonded together to create a surface that’s both strong and super-performing.
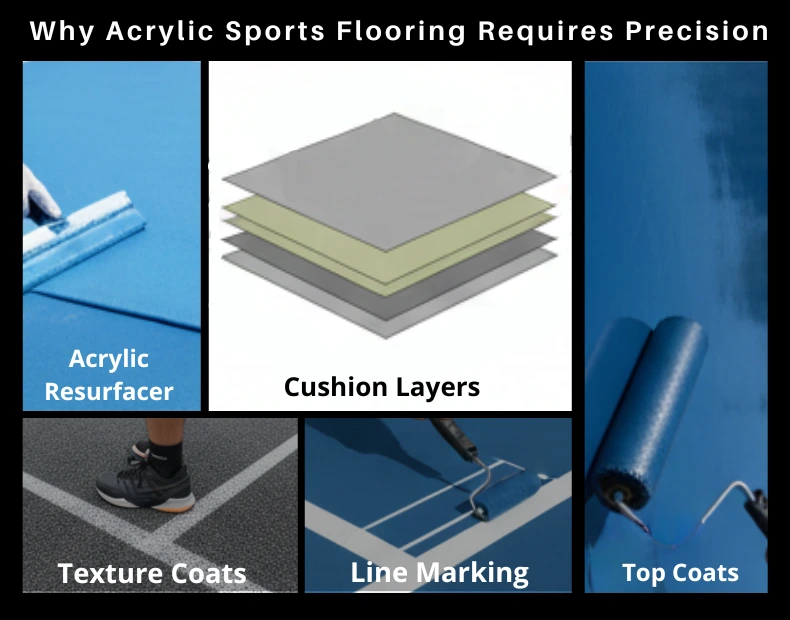
Acrylic resurfacer: Smooths surface imperfections and provides a strong base for the next layers to bond.
Upgrade Your Sports Court Today
Get premium synthetic acrylic flooring designed for durability, grip, and performance.
Get Free ConsultationCushion layers: They provide essential shock absorption, reduce player fatigue, and make the court significantly more comfortable.
Texture coats: Provide the grip and traction that athletes need to move around safely.
Top coats: Give the court its rich colour, protect it from the sun, and seal the whole thing for good, so it lasts as long as possible.
Acrylic line marking paint: That’s what gives courts nice sports markings that stay bright even when the players are playing over them.
All those layers together make a difference:
- Player comfort: Good cushioning helps players move easily, prevents injuries, and reduces fatigue on the court.
- Traction: If the texture is right, then athletes can run, jump, and turn without losing their footing.
- Ball bounce: If the layers are all stacked up right, then the ball bounces the same all over the court.
- UV stability: Good quality materials will keep the colour looking bright and not turn white or start to fall apart.
- Weather resistance: Acrylic coatings can put up with hot weather, humidity, rain and dust – all the things that can make the court tough in India.
That’s why top places rely on people who know what they’re doing – or on a good synthetic acrylic sports flooring manufacturer in India who knows how to get it all done just right.
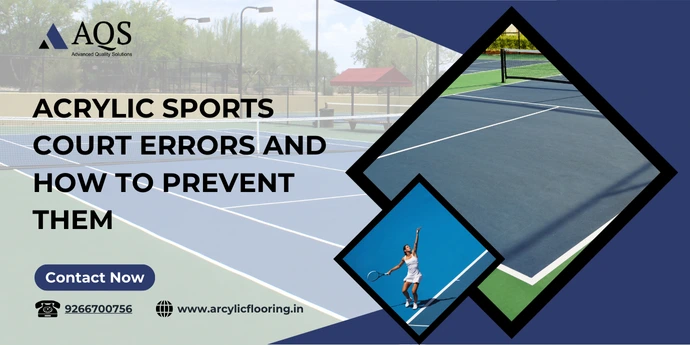
The Most Common Acrylic Flooring Mistakes Installers Make
Installers repeatedly create common sports court disasters that raise long-term costs, ruin playability, cause extensive damage, and force premature resurfacing.
1. Poor Sub-Base Preparation — The Root of Most Problems
The vast majority of acrylic flooring failures start right at the base. If you’re working with a sub-base that’s just not up to scratch – uneven, weak, or still not fully set – then you’re looking at long-term structural problems which no amount of fancy top coat work is gonna sort.
Consequences of sub-base prep: Properly laid or not, a surface that isn’t level is gonna lead to all sorts of issues – uneven bounce & ball deflection being a big one, for example, which just adds to the fun when it comes to consistency in play. But that’s not all – before you know it, you’ll have cracks appearing all over the shop as the concrete starts to shift under pressure.
Common mistakes include: Not getting the compaction right leaves the ground free to settle in all sorts of uneven ways. Getting the WMM/GSB thickness wrong weakens the whole foundation. And if you ignore the drainage – not having a decent 1:100 slope – then water is going to start collecting.
Best practices: Make sure you’re properly compacting the base for a stable foundation. Don’t forget to keep a smooth water runoff with that 1:100 slope. Let the concrete cure for at least 21-28 days before you start worrying about the surface.
A top-quality acrylic floor always starts with a rock-solid base – no exceptions.
2. Installing Acrylic Flooring in Wrong Temperature or Weather Conditions
Acrylic paint needs to dry in pretty stable weather to come out right. Even small changes in the climate can cause problems down the line.
Typical mistakes: Trying to apply coats in heavy rain or really humid conditions is just a recipe for disaster – it disrupts the bond and leaves you with a surface that’s gonna be a mess. And if it’s too hot – above 40 degrees Celsius – the paint dries in a flash, and you’re left with a layer that’s not fully cured underneath.
Why this causes failures: When moisture or temperature shifts get trapped underneath the layers. The paint just starts to peel off when it can’t bond properly with the surface.
Ideal Indian weather window for installation: If you can get the temperature between 15 degrees – 35 degrees Celsius. And low humidity – below 60% – helps keep the moisture out. No rain for at least 24 to 48 hours will give it the best chance to dry properly.
Getting it right at the start really makes all the difference in how good your acrylic sports court flooring is going to look and how long it lasts.
3. Incorrect Mixing Ratios of Acrylic Materials
Acrylic paint is only as good as the proportions of emulsion, sand, water, and cushion material you mix it with. Get the ratio wrong, and the whole thing falls apart.
Effects of incorrect ratios: Your texture all of a sudden becomes all over the place when you don’t get the right balance of sand and emulsion. And if the sand levels are off, your grip is shot. But it’s not just that – if the mix doesn’t bond right, you’ll get adhesion issues.
Common installer errors: Adding too much water is a big no-no – it’s just gonna weaken the whole thing. Using the wrong type of sand mesh will always give you texture issues. And if you overload the cushion granules, your new surface is just gonna be too soft.
Following the manufacturer’s instructions is the best way to avoid these kinds of problems
4. Skipping Primer or Base Coats
Primer and base coats are really the foundation of the whole acrylic system. Skip ’em, and you’re gonna end up with a finish that just doesn’t last.
Why these layers matter: The primer gives you that initial bond with the surface. The base coats just level everything out for a smooth finish. And the resurfacer – that’s what gets you ready to go with the texture and top coats.
Skipping these layers leads to: You get peeling because the adhesion just fails. And the surface starts to scale because the weak layers just flake off.
Proper sequencing of acrylic flooring layers is essential for performance.
5. Applying Acrylic Layers Too Thick or Too Thin
Accurate layer thickness ensures long-lasting court paint, consistent bounce, and a stable playing surface.
Issues caused by thick layers: Layers crack when they lose flexibility. Moisture gets trapped, extending curing time. Texture becomes unstable, affecting traction. Soft patches appear from overbuilt sections.
Issues caused by thin layers: Look forward to premature wear and tear – the low material depth just can’t cut it. You’ll also get patchy colour, which we all know isn’t the look you want. And don’t forget about the increased friction – it’s not exactly comfortable on your joints. And then, of course, there’s the small matter of the base paint getting exposed, allowing moisture to get in.
Getting the sports court paint coverage right is something that’s going to give you a consistent performance right across the court.
6. Cleaning the Surface Before Application
If the surface isn’t properly prepared before applying that acrylic coating, then you can expect lots of problems – dust, moisture and uneven surfaces are just a few of the things that can cause the coating to not bond properly.
Common cleaning mistakes: Blowing the dust off it’s not as easy as it sounds. Applying the coating to a damp surface will trap the moisture, and before you know it, you’re looking at blistering.
Effects of improper cleaning: Adhesion issues – and that means peeling. Moisture trapped in the surface leads to blistering. It just isn’t pleasant when the surface is uneven – it affects the ball bounce and movement, and you’ve got surface bumps, which cut the court’s lifespan down to nothing.
Getting a surface that’s been properly cleaned and repaired before you start is going to give you a strong foundation to work with – literally.
7. Incorrect Line Marking Techniques
If you get the line markings right, you can expect to get a sports court that actually plays well – and is also compliant with official standards.
Common installer errors: Don’t get the measurements right, and you end up with a non-standard court. Paint bleeding can also create unclear lines – not ideal. And then there’s the low-quality tape that gives you irregular edges. Don’t get the timing right and you’ll be applying lines while they’re still wet – which means they’ll smudge or peel off before you know it.
Best practice: It’s all about using the right tools for the job, following the measurements as they should be, and marking the lines only after they’ve had time to fully cure – you’ll be left with nice, crisp lines that are actually going to last.
Getting the line work right is something that’s just as important as getting the paint right – it’s what gives your court its functionality and a bit of style.
8. Not Allowing Proper Curing Time Between Layers
The curing time is actually pretty key to how strong and durable your paint is going to be – and if you don’t get it right, you’ll be making a big mistake.
Mistakes include: Remember that if you apply a new coat before the old one is properly dry, you’ll trap in the moisture – and that’s just going to lead to all sorts of problems. Don’t get the weather right, and you’ll be left with uneven hardness and very noticeable defects.
Results: You might find that footprints get stuck in the surface, which isn’t exactly what you want. The paint will also develop a soft texture – not a lot of fun. And then there’s the possibility of peeling – when the layers just don’t bond properly. And if that’s not enough, you might even see visible streaks – from coatings that just haven’t had time to fully harden.
Curing guidelines: It’s as simple as letting at least 2-4 hours pass between coats, allowing 24-48 hours before you even think about applying the line markings, and then leaving the court for another 48-72 hours before you can get back to playing – this will give you a great, strong finish.
How to Avoid These Acrylic Flooring Mistakes?
To avoid getting it all wrong on your sports court flooring in India, facility managers and installers need to adopt a methodical and technically sound approach. Below is a solid, pro-grade checklist that draws on the best of what’s worked globally in acrylic court construction:
1. Structurally Perfect Sub-Base
The acrylic flooring base needs to be solid, level, and designed to let water drain properly. Use a well-compacted, properly sloped, fully cured, crack-free and moisture-free sub-base.
2. Install Acrylic Flooring During Safe Weather
Avoid installing in extreme heat or rain, and use dust barriers in windy areas to protect wet coatings.
3. Follow Manufacturer Mixing Ratios
Mix the acrylic materials just right, and the wrong proportions, and you’re in for trouble. Always use the silica sand mesh size the manufacturer recommends, and don’t think about mixing products from different brands.
4. Never Skip Layers
Each layer – from primer to top coat – has a role to play in how well the flooring performs and how long it lasts, so don’t skip any of them. You need to get every step right, or your flooring will fade.
5. Maintain Layer Thickness
Even, consistent layer thickness ensures proper bounce, strong grip, and long-lasting durability for any acrylic sports court. Stick to the recommended coverage guidelines and use a correct squeegee to get every layer the right thickness.
6. Use Precise Line Marking
Follow the ITF, FIBA, BWF or pickleball standards and use some good-quality masking tape to get those lines sharp and clean.
7. Respect Curing Times
We all want to get the job done quickly, but when it comes to acrylic flooring, you can’t rush it. Give each layer the time it needs to cure properly, or you’ll end up with a flooring that doesn’t last. Don’t try to cut corners – let it cure properly.
AQS Advantage: Engineered for Indian Sports Conditions
AQS develops synthetic acrylic flooring systems designed for India’s heat, humidity, rain, dust, and high footfall—ideal for schools, academies, clubs, housing societies, and multi-sport complexes.
Why AQS Performs Better
1. Climate-Optimised Formulation
UV-stable pigments, weather-resistant polymers, and anti-skid textures ensure stable performance in harsh outdoor conditions.
2. Consistent Layer Coverage
Precisely engineered materials help maintain uniform thickness, elasticity, and traction across the entire surface.
3. Multi-Sport Ready
Perfect for tennis, pickleball, basketball, volleyball, badminton, and multi-sport courts with excellent adaptability to varying multi-sport court dimensions.
4. Installer-Friendly Materials
Easy application, stable mixing, faster curing, and long-term durability reduce installation errors and ensure a professional finish.
5. High-Grade Synthetic Flooring Materials
Premium acrylic emulsions, silica sand, cushion granules, and texture coats create durable, skid-resistant, visually appealing courts.
6. Strong Technical Support
AQS guides installers on layers, weather, paint, and markings to prevent mistakes and ensure long-lasting courts.
Conclusion
Acrylic sports flooring – you can count on it to be reliable, but you’ve got to get the installation just right. Do it wrong, and you’re basically begging for trouble. Most of the issues with acrylic sports court flooring – stuff like peeling, cracking, texture that’s off, water pooling, fading and weird soft spots – all stem from some pretty basic mistakes made on the job site during the construction phase.
Get the right process in place, and use top-notch synthetic flooring materials, and an acrylic court will give you years of service for tennis, basketball, volleyball, badminton, pickleball and even multi-sport setups all over India.
For schools, clubs, academies, sports complexes and recreational centres across India – if you want to end up with a court that’s safe, durable & performs – the smart way to go is to stick to some tried & tested best practices and choose materials from a pro synthetic acrylic sports flooring manufacturer in India.
Frequently Asked Questions
Acrylic flooring fails when the base is weak, the weather conditions are unsuitable, or the materials are mixed incorrectly.
Ensure proper priming, follow the correct layer order, and allow full curing between coats to prevent peeling.
Install acrylic courts in dry weather with moderate temperatures, ideally between 15°C and 35°C, for best results.
Uniform layer thickness ensures consistent bounce, stronger grip, and a longer-lasting acrylic sports court surface.